
|
|
CBX Stripdown - page 18
(Vol. 54 - April 1992)
|

- When assembling the con rods onto the crankshaft,
tighten the nuts up in two or more steps and make sure that
oil hole in the conrod faces towards the rear of the
crankcase. Do not mix up the rods and caps.
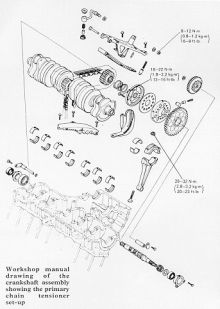
- Use graphogen on main and big end shells. Available
from any good engine parts supplier like Edmunds Walker.
- Do not forget the four bolts on the upper crankcase. This
is easily done and they're difficult to replace with the engine
in the frame!
- On page 11-13 of the genuine workshop manual you will
see a caution. This is incorrect. Use the caution with the
picture on page 11-13 and all will be well - but take care.
The exploded diagram on page 11-13 has the gears
numbered from the wrong ends. When I approached Honda
on this matter recently their spokesman said (and I quote), "I
couldn't care less". Remember this when you buy your next
bike.
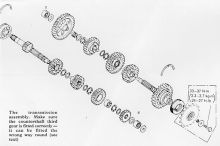
- Always make sure you align all oil holes on shafts and
gears.
- If crankcases do not come apart or go together easily
check to see you haven't missed any bolts. This is easily
done.
- Check to ascertain that the four prongs on the rear of the
clutch outer have engaged with the oil pump drive sprocket.
- Do not use the factory tools when putting pistons into
cylinder. Use your hands and a blunt point with the
assistance of a friend. Even after a rebore the pistons
should slide easily up and down the bore. If you find them
tight, check the oilring side rails are properly located. It is
easy to turn these up the bore with disastrous
consequences.
- When checking the warp on the cylinder head also check
the cylinder. This can warp as well.
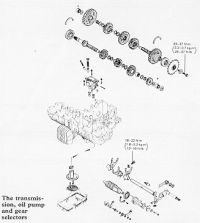
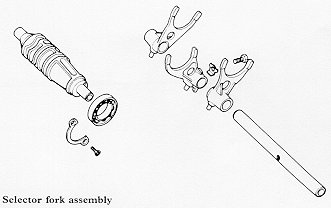
- Having disassembled both crankcase halves and
removed the two gear shafts and crankshaft, you are left
with three things - selector drum, selector shaft and forks
and the oil pump.
- The selector drum is not a problem to replace as it will
only go in one way. Also the selector forks and shaft, these
are marked so keep them together and all will be well on
reassembly.
- The oil pump needs care. Do not forget the locating
dowels and two 'O' rings where the oil pump bolts to the
crankcases.
- It is also advisable to strip the pump and check for
scoring especially if the engine has had a disaster.

|
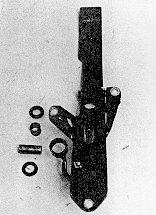
The primary chain tensioner. This one had been leaking which
caused the chain to rattle
|
|
WORKING on a CBX is a daunting proposition when first
considered. But by applying common sense and working in
a clean environment with the correct tools, the engine is
within the capability of the good DIY home mechanic.
 Bear in mind that this four part stripdown feature is
designed to be used as a complement to your official
workshop manual and remember that Classic & Motorcycle
Mechanics is devoted to helping out where it can.
Bear in mind that this four part stripdown feature is
designed to be used as a complement to your official
workshop manual and remember that Classic & Motorcycle
Mechanics is devoted to helping out where it can.
If there are any further queries about the rebuild procedure
write to our 'Problem Solver' section and our experts (which
include John Wyatt) will write back with the answer.
John can also supply spare parts. He has been working on
the CBX for ten years and just loves the bike. He bought a
new one in September 1980 which he still runs in a condition
which has to be seen to be believed - and I mean at the top
end of the scale!
John Wyatt can be contacted at 9 Wharfe Bank, Tadcaster,
North Yorks LS24 9BA. Tel 0937 832965.
- And that’s editor Bob’s engine finished. What’s he done
with it since we dropped it off in his garage? See 'Staff
Bikes' on pages 42-46.

)
)
)
)