My '79 Restoration
-
NobleHops
- ICOA Member

- Posts: 3872
- Joined: Mon Jan 25, 2010 7:17 am
- Location: Tucson, Arizona, USA
- Location: Tucson, Arizona, USA
Re: My '79 Restoration
Gotcha. Sorry I missed that. You guys are obviously quite skilled, that was an impressive amount of good work done.
Nils Menten
Tucson, Arizona, USA '80 CBX, sort-of restored :-)
Tucson, Arizona, USA '80 CBX, sort-of restored :-)
-
Russ
- Forum Regular

- Posts: 38
- Joined: Mon Aug 31, 2015 11:42 am
- Location: North Wales
- Location: North Wales
Re: My '79 Restoration
Did a lot of research for the correct paint type for the engine. Bought enough Motip VHT paint to do it twice (and didn't use it  ), sprayed aluminium sample pieces with different paint, with and without lacquer. Then put them all in the oven at 200'C and compared them with unbaked ones etc.etc. I took months to make a decision, once it's done there was no going back so had to be right.......
Looked at engines from the US and how they were done, eventually settled on an Aluminium colour from Rustoleum. A renowned engine builder replied to an email saying he used normal wheel paint and tests it in the oven, if it doesn't blister or discolour after a couple of cycles it should be OK to use - apparently most of the colour changes after heat are from the lacquer so decided I wasn't going to use it. I didn't test it for petrol / solvent resistance.
Added an adapter plate to the mounting frame so it could be rotated on an engine stand.
First the etch primer;
Then the top coat;
I let the paint go off for a couple of days before doing any more work on it. After testing the samples in the oven they dulled off after a couple of heat cycles so the paint on the motor won't be as shiney after it has been run a few times.
The cam cover / end caps, crank covers and the clutch covers are normally polished but they take an awful lot of keeping clean and the only real way to keep them that way is to remove them and do them off the bike on a regular basis. I had a think about polishing them all up but decided this wasn't a route that I wanted to go down so sent them to be ceramic coated with Cermakrome, this was fekin expensive but it's thermally very tough, virtually bulletproof and never looses it's shine - also sent the exhaust header collars for the same treatment. On the whole I'm pleased with the outcome.
Things are slowly coming together now.....although I was determined not to get anything else but another bike came up and I went and bought it...... This will slow me down again.
You do not have the required permissions to view the files attached to this post.
-
FalldownPhil

- ICOA Member
- Posts: 929
- Joined: Fri Feb 10, 2006 11:25 pm
- Location: Marina Del Rey, CA. USA
- Contact:
Re: My '79 Restoration
WOW !!
It's beautiful
Phil
It's beautiful
Phil
When you are up to your ass in alligators it is sometimes difficult
to remember that your objective was to drain the swamp !!
to remember that your objective was to drain the swamp !!
-
NobleHops
- ICOA Member
- Posts: 3872
- Joined: Mon Jan 25, 2010 7:17 am
- Location: Tucson, Arizona, USA
- Location: Tucson, Arizona, USA
Re: My '79 Restoration
What he said! ^^^FalldownPhil wrote:WOW !!
It's beautiful
Phil
Nils Menten
Tucson, Arizona, USA '80 CBX, sort-of restored :-)
Tucson, Arizona, USA '80 CBX, sort-of restored :-)
-
daves79x
- ICOA Technical Director

- Posts: 4760
- Joined: Sun Oct 01, 2006 8:05 am
- Location: Knox, PA
- Location: Knox, PA
Re: My '79 Restoration
Excellent! Curious though, if you meant the cam cover was polished too? It was not polished on the early model - painted just like the engine.
Dave
Dave
-
Russ
- Forum Regular
- Posts: 38
- Joined: Mon Aug 31, 2015 11:42 am
- Location: North Wales
- Location: North Wales
Re: My '79 Restoration
Shouldn't have said "normally", maybe "generally" would have been better, should have read it through a few more times. I know they were painted but a lot of the bikes I see the covers are polished and I didn't want to go down that route. Covers have been ceramic coated, will put pictures up when I get time.daves79x wrote:Excellent! Curious though, if you meant the cam cover was polished too? It was not polished on the early model - painted just like the engine.
Dave
-
martini
- New Member & Happy To Be Here

- Posts: 20
- Joined: Fri Dec 07, 2018 8:34 am
- Location: Finla
- Location: Finla
-
wyly

- ICOA Member
- Posts: 1727
- Joined: Tue Oct 30, 2007 4:20 pm
- Location: calgary alberta canada
- Location: Calgary Canada
Re: My '79 Restoration
I had my cam cover ceramic coated my mechanic was surprised it didn't warp...he said it's risky the cam cover is filmsy and there's a lot of heat involved and always a risk something will warp...my cover turned out okay but I hesitate now to do any other parts...so I polish 
CBX a work in progress, still improving...GS1150EFE completed and awaiting modifications.....RD350, remnants in boxes scattered throughout the garage
-
Russ
- Forum Regular
- Posts: 38
- Joined: Mon Aug 31, 2015 11:42 am
- Location: North Wales
- Location: North Wales
Re: My '79 Restoration
So, while the engine bits are away for their expensive coating......
I had already had some sub assemblies together, forks, clocks, etc. The main stand was put onto the frame, then head stock, handle bars and forks. The G clamp at the bottom is to stop the main stand accidentally folding up and everything collapsing .
.
Bottom yolk was in good shape so was not polished or laquered.
Swingarm with new plain bronze bearings and footrest brackets were put on. Front pegs with Wim's new rubbers
Rear wheel and chain, chain is endless so needs to go in with the swing arm
Headlight frame with rubber mounts and clocks go on, the horn was stripped and polished / powder coated.
The the battery box and rear tank mount with new fixings.
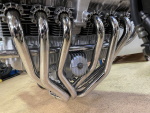
Then a call from the ceramic coaters.....engine bits are ready to be collected.
Quick trip to pick up the parts. The rough procedure is they clean and blast them, then coat in a finish and colour of your choice, bake them and then polish with a finishing media or tumble bath. As I've said the finish is very tough, but it's not aesthetically good as polishing or chroming.
Cleaned all the gasket surfaces off ready for the new joints, checked the cam timing for the umpteenth time, new plugs fitted and oiled the cam bearings and lobes.
Cam cover on, the rubber gasket has a mind of it's own and is a bitch to keep in place while the cover goes on.
Clutch cover on with new actuator shaft seals, timing gear and cover back on, I have a spare polished cover and will decide which one to keep on the bike when it's finished.
Alternator cover wasn't painted as the early ones were magnesium and gasses out with the heat of the ceramic coating process.
Motor almost ready to go back into the frame, got to put the carbs, cables and some other bits on....then get two or three others to give me a lift
I had already had some sub assemblies together, forks, clocks, etc. The main stand was put onto the frame, then head stock, handle bars and forks. The G clamp at the bottom is to stop the main stand accidentally folding up and everything collapsing
Bottom yolk was in good shape so was not polished or laquered.
Swingarm with new plain bronze bearings and footrest brackets were put on. Front pegs with Wim's new rubbers
Rear wheel and chain, chain is endless so needs to go in with the swing arm
Headlight frame with rubber mounts and clocks go on, the horn was stripped and polished / powder coated.
The the battery box and rear tank mount with new fixings.
Then a call from the ceramic coaters.....engine bits are ready to be collected.
Quick trip to pick up the parts. The rough procedure is they clean and blast them, then coat in a finish and colour of your choice, bake them and then polish with a finishing media or tumble bath. As I've said the finish is very tough, but it's not aesthetically good as polishing or chroming.
Cleaned all the gasket surfaces off ready for the new joints, checked the cam timing for the umpteenth time, new plugs fitted and oiled the cam bearings and lobes.
Cam cover on, the rubber gasket has a mind of it's own and is a bitch to keep in place while the cover goes on.
Clutch cover on with new actuator shaft seals, timing gear and cover back on, I have a spare polished cover and will decide which one to keep on the bike when it's finished.
Alternator cover wasn't painted as the early ones were magnesium and gasses out with the heat of the ceramic coating process.
Motor almost ready to go back into the frame, got to put the carbs, cables and some other bits on....then get two or three others to give me a lift
You do not have the required permissions to view the files attached to this post.
-
EMS
- ICOA Member
- Posts: 10151
- Joined: Wed Mar 05, 2003 7:55 am
- Location: North East OH, ICOA 3904
Re: My '79 Restoration
I may have stumbled over another one of these unexplainable mysteries:
Russ:
Do I read this correct - the VIN number on your frame is CB1 -20 02997 ?
If so, I have that VIN listed as a Canadian bike from an owner in Nova Scotia....
Russ:
Do I read this correct - the VIN number on your frame is CB1 -20 02997 ?
If so, I have that VIN listed as a Canadian bike from an owner in Nova Scotia....
-
Russ
- Forum Regular
- Posts: 38
- Joined: Mon Aug 31, 2015 11:42 am
- Location: North Wales
- Location: North Wales
Re: My '79 Restoration
Sorry bud, it's 2007997, there is a clearer picture of the frame and VIN plate earlier in the thread.EMS wrote: Do I read this correct - the VIN number on your frame is CB1 -20 02997 ?
If so, I have that VIN listed as a Canadian bike from an owner in Nova Scotia....
Russ
-
daves79x
- ICOA Technical Director
- Posts: 4760
- Joined: Sun Oct 01, 2006 8:05 am
- Location: Knox, PA
- Location: Knox, PA
Re: My '79 Restoration
Everything looks great! Curious about the alternator cover. Magnesium polishes up OK for a few minutes, then in service will turn color again. Why not just paint it as original? As to the valve cover gasket, just glue it to the cover - it'll stay in place just fine
Dave
Dave
-
Russ
- Forum Regular
- Posts: 38
- Joined: Mon Aug 31, 2015 11:42 am
- Location: North Wales
- Location: North Wales
Re: My '79 Restoration
The alternator cover was polished and clear coated by the firm who did the ceramic coating. I figured if I didn't like it I could then paint it as per original, so I had best of both worlds. I do like it so it's staying as is for the time being. I did stick the rocker gasket down the the cam cover with Honda bond but didn't want to use loads of it and as I was putting it onto the head it, frustratingly, kept on "rolling" slightly in various places. All turned out OK though.daves79x wrote:Everything looks great! Curious about the alternator cover. Magnesium polishes up OK for a few minutes, then in service will turn color again. Why not just paint it as original? As to the valve cover gasket, just glue it to the cover - it'll stay in place just fine
Dave
Russ
-
Syscrush

- ICOA Member
- Posts: 1717
- Joined: Fri Sep 14, 2012 2:29 pm
- Location: Toronto, ON
- Location: Toronto, ON
Re: My '79 Restoration
This is looking beautiful. Thanks for the updates!
-
NobleHops
- ICOA Member
- Posts: 3872
- Joined: Mon Jan 25, 2010 7:17 am
- Location: Tucson, Arizona, USA
- Location: Tucson, Arizona, USA
Re: My '79 Restoration
Great project Russ! Really enjoying it. 
Nils Menten
Tucson, Arizona, USA '80 CBX, sort-of restored :-)
Tucson, Arizona, USA '80 CBX, sort-of restored :-)