This is kind-of my re-introduction, as I'm an ICOA member and did previously have a login, but it got lost in some or other site maintenance, so I'll just do it again!
My name is Nils, I live in Massachusetts, and I'm the proud owner of an '80 CBX that I am doing a pretty complete restoration of. I'll admit that wasn't the plan when I tore into it, but you all understand what happened next, way better than anybody else in the world might
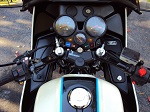
Here's a gallery of my bike during restoration, although you are forewarned these are not beauty shots, more like 'photograph this so I have a chance of getting it back together' shots:
http://noblehops.smugmug.com/Motorcycle ... 3586_tUmBm
So far the black and chrome bits have all been powdercoated or rechromed, the engine has been powder-blasted and painted, side covers polished, valve cover powdercoated, and the wheels are all rebuilt, powdercoated, and the silver bits polished for a bit 'o bling. There's a Delkevic repro system waiting in the attic along with a new Honda seat, and all the black plastic bits are off getting reshot with SEM satin bumper paint.
Racetech rebuilt the fork with gold valves and progressive springs, new shocks are in process, and a fork brace is on order from Superbrace.
A CBR1100F swingarm is inbound, and my carbs just came back from the full Mike Nixon treatment.
So this thing should look and ride pretty well I'm hoping, and look not to far from stock.
I just turned the corner a couple of week ago to reassembly, and have found this site and the now-defunct 'other site' absolutely invaluable. Thanks to all the contributors here and on the other site that have made this project so much easier with your experience and help.
I'll update this thread as I go, for those interested in my progress.
Nils Menten