
|
Refinishing Engine Cases - page 3 |
|
|
Refinishing Engine Cases - page 3 |
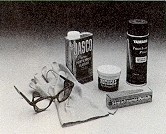
Step 4: The parts must be clean if you expect the new clear paint to stick. A freshly polished part has its surface impregnated with polishing compound and oily debris; that stuff is rather tenacious and some care is needed to ensure that it is all gone. Hot soapy water, a cloth and elbow grease seem to be the most successful combination. Use a soap like Formula 409, Fantastik or dissolved dishwasher detergent; these are powerful and won't damage the freshly polished surface. Dry the parts in the sun to get rid of all the water and to warm them slightly before you paint.
Step 5: I have searched many years for a satisfactory aerosol clear paint and have found a couple that are tough and a couple that are clear. The only one I know of that is both is sold by Yamaha as Clear Top Coat (PNT-65000-04-00). Before you go out and get something from the drug store, consider that many of us have tried a number of different paints and prefer this one.

|

|
|
||
| Nothing works for polishing aluminum like liberal applications of elbow grease. Small amounts of polishing compound work best and they should be rubbed until virtually dry. | Paint remover effectively strips old clear coat but is caustic and will bum your skin. If the remover is washed away quickly, there will be no damage to the aluminum beneath. | Paint remover, polish and paint are the main ingredients in the recipe for glazed aluminum parts. Mixed with elbow grease and time, your bike's old castings can look better than new. |
Clear can be difficult to apply simply because it is hard to see as it goes on. If you can arrange a single light so it is reflected in the polished metal surface, you will be able to see the clear as you apply it and can then better control the painting. Also, there are no pigments to help hold it in place, so it tends to run easily. Practice on a part that isn't prominent. It certainly helps if you are shooting on a warm, dry day. The paint can should be somewhere near 70 degrees Fahrenheit and so should the parts.
Apply a very thin coat and let it sit for a couple of minutes. This coat will partially dry and then stick to both the metal and the next, thicker coat you lay on. If you spray with the spray head too close to the surface, the paint tends to bubble and run because it is too thick directly under the blast of the nozzle. I have found that the guys who write the instructions seem to know, and I follow their directions.
After the paint is dry enough that bugs won't stick to it, lay the parts in the sun to dry. If you have no sun, you can use an oven if you are very careful not to let the temperature get above about 200 degrees and the paint has had some time to dry first.
Cleaning up, polishing and repainting are the three basic steps. None of them is difficult; none requires years of experience. The most important part of the job is the belief that you can do it. That belief together with the knowledge gathered by other enthusiasts and presented here give you the tools needed.
Besides the satisfaction of doing something well, you will also have a much better looking bike. A good scrubbing, some touch-up and freshly polished and protected castings can make a scruffy bike into one to admire. Old paint just needs new paint.
| PAGE: | Home | 1 | 2 | 3 |
|---|