I received all shims and adjusted valves today. All are at .013.
As I was adjusting them, I started hearing noises out of the exhaust while turning the engine( like when opening bottle of wine) which I don't remember hearing when checking valves.
I also adjusted the front chain, replaced the "O" ring on the adjuster bolt and rubber plug
I do have few questions:
When I loosened the bolt I did hear click but wasn't looking for chain movement so I didn't see it move.
Does this mean that it got adjusted?
Manual states to fill oil in where the cam lobs are but it leaks out from underneath plastic oil stoppers.
How am I suppose to fill the oil there without having it leak out.
I had to put a bit of gasket sealant between gasket and valve cover so it will stay in place when I flip the cover over.
I also added some sealant at the spots that manual calls for.
Other things I repaired
- fixed leak at the oil feed line on the crankcase
- changed o ring and rubber plug at the front chain adjuster
- polished side valve cover side covers
- removed clear coat off of valve cover and polished bad areas
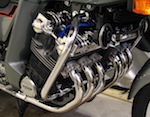
- removed exhaust headers, washed, cleaned and polished them
- adjusted clutch at the cover
- checked carbs again and left fuel mixture at 2 turns out
- new oil and filter
Ready to put things together and ride it this weekend
Valve Adjustment
-
cross

- ICOA Member

- Posts: 871
- Joined: Tue Jan 21, 2014 11:26 am
- Location: San Diego
- Location: San Diego, Ca
Re: Valve Adjustment
Sasha
'82 Honda CBX
'99 Triumph TBS
'01 Honda Valkyrie

'82 Honda CBX
'99 Triumph TBS
'01 Honda Valkyrie
-
daves79x
- ICOA Technical Director

- Posts: 4754
- Joined: Sun Oct 01, 2006 8:05 am
- Location: Knox, PA
- Location: Knox, PA
Re: Valve Adjustment
Yes, you actually need to glue the gasket to the cover all the way around or you'll be fighting it forever. I use Hondabond case sealant for that, but 3M Super Weatherstrip Adhesive works well too. And yes, a bit of sealant goes on the half-circles of the gasket. I usually use the Hondabond there, but it really sticks and is hard to get back apart.
Did you remove the plugs when adjusting the valves? Did you adjust the rear cam chain? Did you put new grommets on the valve cover hold-down bolts? Don't bother with the 'fill with oil part'. Just crank the engine with the kill switch off to build pressure before starting.
Sounds like you got most everything taken care of.
Dave
-
cross
- ICOA Member
- Posts: 871
- Joined: Tue Jan 21, 2014 11:26 am
- Location: San Diego
- Location: San Diego, Ca
Re: Valve Adjustment
Ok i just had some permatex gasket sealant that does stay flexible as i already had it.
I removed only plug 1 and 6 when adjusting the valves not all.
I did adjust rear chain and i did hear it click and move but for the front one i just heard click but did not see it move as i forgot to look for it.
Do valve cover grommets go on dry? Should i rub them with oil a bit?
I also do have difficulty checking the oil level, i'm always under or over.
The manual states to warm the engine, let it sit a bit ( on the center stand) wait few minutes and check the level. Checking like that, i always end up with too much oil.
I started checking it when i come home after a ride but in that case i'm under. last time i think i overfilled it as when i tilted the engine to do the valves, there was oil seepage around all of the grommets, valve cover gasket and oil feed line to the head. Before that it was mostly dry in those places.
Any tricks that i don't know about?
Thank you
Sasha
Sasha
'82 Honda CBX
'99 Triumph TBS
'01 Honda Valkyrie
'82 Honda CBX
'99 Triumph TBS
'01 Honda Valkyrie
-
Sharpie66

- ICOA Member
- Posts: 134
- Joined: Mon Sep 30, 2013 4:39 pm
- Location: Holland,NY
- Location: Holland,NY
Re: Valve Adjustment
Having recently adjusted my valves for the first time, the question came to mind of what the "ideal" setting would be. Perhaps tighter on intake and looser on exhaust or vice versa or both even and set on the loose side like Sasha did.cross wrote:I received all shims and adjusted valves today. All are at .013.
Any comments and/or explanation will be greatly appreciated by this 1yr newbie...
Patrick
Don't take life too seriously, you will never get out of it alive.
-
cross
- ICOA Member
- Posts: 871
- Joined: Tue Jan 21, 2014 11:26 am
- Location: San Diego
- Location: San Diego, Ca
Re: Valve Adjustment
Ideally .013mm all around.
I think one or two intakes ended up being maybe .014mm but i think that it's ok.
There are plenty shims around to get them right
I think one or two intakes ended up being maybe .014mm but i think that it's ok.
There are plenty shims around to get them right
Sasha
'82 Honda CBX
'99 Triumph TBS
'01 Honda Valkyrie
'82 Honda CBX
'99 Triumph TBS
'01 Honda Valkyrie
-
Sharpie66
- ICOA Member
- Posts: 134
- Joined: Mon Sep 30, 2013 4:39 pm
- Location: Holland,NY
- Location: Holland,NY
Re: Valve Adjustment
I swapped as many shims around as I could and ended up ordering some as well. Most came in at around .09. Discussions were made about the benefits, if any, of setting an overlap by shimming the intakes on the tight side and the exhaust on the loose side.
I used permatex gasket sealer also and did not have any leaks. Woot woot.
PC
I used permatex gasket sealer also and did not have any leaks. Woot woot.
PC
Don't take life too seriously, you will never get out of it alive.
-
Larry Zimmer
- ICOA Web Post/Pix/Video Archive Mgt
- Posts: 2207
- Joined: Mon Dec 15, 2003 2:32 pm
- Location: Brighton, MI
- Location: Brighton, Mich
- Contact:
Re: Valve Adjustment
I don't have a book handy at the moment. (About 2000km away.) BUT, I suggest you might check that. 013mm value guys. That's a bit tight!!! If your talking inch, that's a bit loose.
Larry Zimmer
cbxlarry@sbcglobal.net
cbxlarry@sbcglobal.net
-
cross
- ICOA Member
- Posts: 871
- Joined: Tue Jan 21, 2014 11:26 am
- Location: San Diego
- Location: San Diego, Ca
Re: Valve Adjustment
Thats what is acording to the manual
0.13mm or 0.005 us standard
0.13mm or 0.005 us standard
Sasha
'82 Honda CBX
'99 Triumph TBS
'01 Honda Valkyrie
'82 Honda CBX
'99 Triumph TBS
'01 Honda Valkyrie
-
daves79x
- ICOA Technical Director
- Posts: 4754
- Joined: Sun Oct 01, 2006 8:05 am
- Location: Knox, PA
- Location: Knox, PA
Re: Valve Adjustment
.003-.005 inch clearance is fine for all CBX valve clearances. I would not leave anything under .003.
Dave
Dave
-
asacuta
- Forum Regular

- Posts: 156
- Joined: Fri Apr 18, 2014 10:21 pm
- Location: Calgary
- Location: Calgary
Re: Valve Adjustment
I think Larry's point was that 0.013 mm is about 1/10 of the specified maximum clearance: an extra 0 after the decimal. See the post from Sasha.
Al
-
Sharpie66
- ICOA Member
- Posts: 134
- Joined: Mon Sep 30, 2013 4:39 pm
- Location: Holland,NY
- Location: Holland,NY
Re: Valve Adjustment
As the manual calls for a clearance between .06mm - .13 mm, I used a metric feeler gauge to check my clearances. I am assuming my earlier post of the ''ideal'' setting is perhaps bordering on being overly neurotic.  Would not be the first time. I just have a desire to always 'understand' the big picture of how things work. My mechanical knowledge is limited however my desire to learn is without limits and I soak up everything you gentlemen offer here. So...
  for sharing that wealth of info.
Don't take life too seriously, you will never get out of it alive.
-
daves79x
- ICOA Technical Director
- Posts: 4754
- Joined: Sun Oct 01, 2006 8:05 am
- Location: Knox, PA
- Location: Knox, PA
Re: Valve Adjustment
The manual also gives inch measurements right along with the metric ones. Back in the day, metric feeler gauges were not so easy to come by. Measuring valve shims is another story.
Dave
Dave
-
cross
- ICOA Member
- Posts: 871
- Joined: Tue Jan 21, 2014 11:26 am
- Location: San Diego
- Location: San Diego, Ca
Re: Valve Adjustment
Very true, shims need to be measured with good micrometer.
What ever is stamped on them can be off a bit, I verified this and a lot of them were a bit off.
I'm also going to try to find feeler gauge set either with mm or inch as it can get confusing having both marks on them.
Update,
I completed the bike, made sure that acc. pump jets are spraying and installed carbs and the exhaust that I cleaned and polished.
Started the bike, checked for leaks and took it for a spin around the block.
It runs noticeably smoother, still chatters but I guess that is by the valve train design.
Off the idle throttle is more responsive, crispier as well but that's probably due to mixture screws turned out from 1.25 to 2 turns out. Mid range throttle is not as responsive as before though.
Clutch seemed much better after adjustment but today during the ride, I did miss few shifts which hasn't happened in a while.
I went on a ride today and bike seems quicker only flat slot around 5500 is now more noticeable but after 6 or so, bike just plus like crazy now.
Choke,
I adjusted the fork for choke to .08mm which is the middle point in the range given by the manual and I have no choke what so ever, before I adjusted it I had just a slight choke.
Anyway, I want to say that everything is better but I'm not sure, I still need to sync the carbs too.
Sasha
Sasha
'82 Honda CBX
'99 Triumph TBS
'01 Honda Valkyrie
'82 Honda CBX
'99 Triumph TBS
'01 Honda Valkyrie
-
herdygerdy
- Power Poster

- Posts: 266
- Joined: Fri Nov 22, 2013 9:48 pm
- Location: Sydney, Australia
- Location: Sydney, Australia
Re: Valve Adjustment
Inlet valves will always run much cooler than exhaust, as they are cooled by the fresh incoming fuel/air mixture charge from the atmosphere. Therefore, they will almost never give any trouble and are far more tolerant of being run on the tighter side of the allowable clearance range. Whoever heard of a burnt out inlet valve?
However, exhaust valves are a whole different story. They run much, much hotter all of the time (compared to inlet valves) due to being perpetually roasted by the outgoing burnt charge that is at, or close to combustion temperature. My understanding is the primary method for the head of a valve to dissipate its heat and prevent it from building up to dangerously excessive temperature (which can very quickly result in a burnt out exhaust valve), is by passing the heat back into the head where it is carried away by cooling oil flow and air.
Apart from through the valve guide (which is physically much further away from the 'blast furnace' of the combustion chamber so that area doesn't get anywhere near as hot), the only way the valve can lose this heat from the passage of the burnt charge past the valve head and prevent dangerous build up of accumulated heat energy, is through the head of the valve's physical contact with the valve seat in the cylinder head. This can only occur while the valve is 'at rest' during the "valve closed" portion of the combustion cycle.
So, thinking this through carefully, a valve with a very small clearance (ie; tight) will have the head of the valve 'at rest' on the valve seat for much less time than a valve that is set to a larger clearance.
This is so because for a valve with larger clearance, it will take more time for the cam lobe to rotate into position (to take up the larger clearance) and for the cam lobe ramp to arrive at the surface of the shim and begin to open the valve.
Therefore, for a valve with larger clearance, there is simply more time available for the heat in the head of the exhaust valve to be transferred across into the head via the valve seat where it is then carried away by cooling oil and air.
This, IMHO, is the reason why it is not only smart but very helpful for the longevity of your valve train, to set all valve clearances to the widest end of the allowable range.
And FWIW, even though I took care to set mine to the max clearance, the engine is still mechanically very quiet.
The old saying 'a noisy tappet is a happy tappet' used by those crusty old school mechanics is true for good reason.
Hope this helps. Cheers...Tony
-
Larry Zimmer
- ICOA Web Post/Pix/Video Archive Mgt
- Posts: 2207
- Joined: Mon Dec 15, 2003 2:32 pm
- Location: Brighton, MI
- Location: Brighton, Mich
- Contact:
Re: Valve Adjustment
All good and true, Tony. Add to that the exhaust valve stem length will increase more than the inlet valve. Due to the greater heat exposure. Thereby contributing to the need for a greater initial clearance setting.
Larry Zimmer
cbxlarry@sbcglobal.net
cbxlarry@sbcglobal.net