Hello Everybody,
The reason I have expressed a desire to register on your forum is due to quite an interesting discovery. I have always been a motorcycle enthusiast, riding bikes since I was 16, due to my fathers engineering passion and hobbies. He had bikes from a very young age as well, however I mostly saw it on pictures and through his memories, as I've never seen him on a bike, due to his lack of time for this hobby. There was also a mysterious bike hidden under the covers in his garage. It has been there for years. Now that I am a grown man, I pretty much secretly went to his garage, where he keeps his 1967 Mustang and his mysterious bike and I took all the covers from it, as I knew it needed some work.
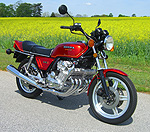
What I discovered is a staggering 1981 Honda CBX, white, with all original parts, fairings, hard saddle boxes, everything looking immaculate, though very dusty (pic attached after I took the beautiful white seat off). I decided to work on this bike and surprise my father one day with it all working and looking like new, so I have been working for it secretly more than a month now. To date, this is what happened:
1. I drained the fuel, as the bike has been sitting now for 25 years untouched. Fuel was red in color and stank like a rotten wine.
2. I have processed the gas tank, cleaned all the gunk, mud, rust and everything that was in it. Or I should rather say I paid professional company to do it, as I didn't trust online chemicals to do a good job. I can verify that the gas tank inside is like new now.
3. Upon working on a gas tank, I have discovered that the goop totally clogged the petcock, leaving me hopeful that none of that stale gas went into carbs. I have thoroughly cleaned the petcock and verified that it's working well now.
4. I have replaced all the fuel lines, as the original ones were quite hard and would break shortly.
5. I have verified the diaphragm is in great condition, vacuum works without fail.
6. I have installed the tank with fresh gas and did a trial run of fuel, meaning I set the petcock to ON, then opened the carb drain to see if the fuel is getting through carbs. This is also working without fail.
7. I verified choke to be working well, butterflies and all the cables working well.
8. I have installed a brand new battery.
With all the above points, the bike struggles to start, or starts for a second or two, runs rough and then dies immediately. I have no idea why is this happening, but common sense would indicate a fuel starvation problem of some sort. I know that there is still a possibility of jets being clogged, however I think the fuel runs well through carbs, therefore before I take the carbs off and embark on this journey, would you recommend something that I may have missed?
Once again, sorry for the long message, but I really appreciate any advice on this matter, as I have heard this forum is extremely helpful. Please kindly help me make this dream come true for my father...
Thank you and I look forward to hearing back from you!
Kind regards,
Airborne
Immaculate 1981 Surprise
-
Airborne
- Forum Regular

- Posts: 30
- Joined: Thu Apr 30, 2015 4:32 pm
- Location: Terre Haute, IN
- Location: Terre Haute, IN
Immaculate 1981 Surprise
You do not have the required permissions to view the files attached to this post.
-
NobleHops

- ICOA Member

- Posts: 3872
- Joined: Mon Jan 25, 2010 7:17 am
- Location: Tucson, Arizona, USA
- Location: Tucson, Arizona, USA
Re: Immaculate 1981 Surprise
Damn, I love this story, you're a good man for doing this.
Those carbs have to get rebuilt. That's the bad news. You'll chase your tail till you do. I see you're in Indiana - there are two guys fairly nearby you that I'd trust with ANYTHING related to getting that bike back together, J.R. And Dave. You'd be wise to drain and replace the motor oil and clean the sump, and your brakes are going to need the same attention, and possibly your fork and steering head.
Treat those cylinders to a few tablespoons of Marvel Mystery Oil while you sort the remainder, make certain there isn't a stuck ring waiting to make mischief.
We will enjoy helping you get this bike shipshape. But only if you clean the darn thing and keep posting photos .
.
Welcome!
Those carbs have to get rebuilt. That's the bad news. You'll chase your tail till you do. I see you're in Indiana - there are two guys fairly nearby you that I'd trust with ANYTHING related to getting that bike back together, J.R. And Dave. You'd be wise to drain and replace the motor oil and clean the sump, and your brakes are going to need the same attention, and possibly your fork and steering head.
Treat those cylinders to a few tablespoons of Marvel Mystery Oil while you sort the remainder, make certain there isn't a stuck ring waiting to make mischief.
We will enjoy helping you get this bike shipshape. But only if you clean the darn thing and keep posting photos
Welcome!
Nils Menten
Tucson, Arizona, USA '80 CBX, sort-of restored :-)
Tucson, Arizona, USA '80 CBX, sort-of restored :-)
-
harvey
- ICOA Member
- Posts: 221
- Joined: Tue Mar 04, 2003 9:19 pm
- Location: Varina, Virginia, USA
- Location: Varina, Virginia, USA
Re: Immaculate 1981 Surprise
Airborne,
Congratulations on your garage find! I am very glad to here you are working to return this CBX to a riding condition and not selling or parting it out.
I am not even trying to answer you questions as I expect some of the tech gurus will jump in and help you.
Congratulations on your garage find! I am very glad to here you are working to return this CBX to a riding condition and not selling or parting it out.
I am not even trying to answer you questions as I expect some of the tech gurus will jump in and help you.
harvey
Ride Safe and Ride Often
Ride Safe and Ride Often
-
EMS
- ICOA Member
- Posts: 10151
- Joined: Wed Mar 05, 2003 7:55 am
- Location: North East OH, ICOA 3904
Re: Immaculate 1981 Surprise
As Nils said, the carburetors definitely need attention and it is not a quick and simple job. The best instruction guide you can get for this is Mike Nixon's step-by-step carb rebuild manual. Either available from him at the Motorcycle Project
http://www.motorcycleproject.com/text/booknook.html#1
or other sellers.
Here is an ebay auction from Bob Frantzke
http://www.ebay.com/itm/Honda-CBX-Carb- ... 7d&vxp=mtr
As a side-note, the bike is an official 1982 model, although it has a 1981 build date on the VIN plate.
Please stay close and keep asking questions. We will all try our best to help you through this.
-
Airborne
- Forum Regular
- Posts: 30
- Joined: Thu Apr 30, 2015 4:32 pm
- Location: Terre Haute, IN
- Location: Terre Haute, IN
Re: Immaculate 1981 Surprise
Hello Noble Hops and Harvey,
Thank you kindly for the prompt response and your kind words. Certainly, I will be more than happy to keep posting photos of how this machine is going along. Even the hard saddle boxes look fantastic on this bike, although I had them off while I work on this bike. I promise to post a picture of it in full gear and glory, as soon as it is done.
Per your advice Noble Hops, I was praying no one will say it, but I guess I was hoping for inevitable to happen. I will take those carbs off and let you know how they look the moment I open the first one. You have mentioned contacting some members who are pros at carb work. Would you happen to know how I could reach them? My first thought was to have a go at it myself, as I like to know the bike and learn as much as possible about it, but if a pro will do the job best for a fairly good price, it might be worth consideration. This bike is definitely not going anywhere, it will stay in this family for generations. I am not going to fix it up to sell, as it has a lot more of a sentimental value to our family, that's for sure.
Furthermore, I'm sorry, I should have mentioned it earlier. I did drain the oil and cleaned it thoroughly. I also replaced the oil filter, although I must say it looked to me that the bike must have had an oil change before it was put to storage, as the oil looked really well, along with the filter. Regardless, considering the time it was sitting, I disposed of it all and put fresh oil and new filter.
I will inspect the forks and the breaks as well, however I need to tackle that engine problem first, as it doesn't let me sleep at night! I have found the manual for this bike (my dad is one of the old school guys, who always keep spares and paperwork handy. which I attribute to pre-Internet era, haha), so removing the carbs rail shouldn't be much of a problem, however if you guys know of any hacks or advise I should be aware of before I do so, please let me know. By the way, I have the airbox already out of the way, so as soon as I take the tank off, I will be able to tackle the carbs.
Thank you and I look forward to hearing back from you and joining me on this interesting journey!
Kind regards,
Airborne
-
daves79x
- ICOA Technical Director

- Posts: 4751
- Joined: Sun Oct 01, 2006 8:05 am
- Location: Knox, PA
- Location: Knox, PA
Re: Immaculate 1981 Surprise
Wow - what a story! Welcome and look forward to helping you on this project. How many miles are on the bike? Yes, the carbs need rebuilt - no way around it. Sent you a PM on that. From experience, you will need to completely rebuild the front and rear brakes, as well as new fork seals and oil, as has been said. New tires as well. Depending on miles, maybe a few other things. Air up the rear shock and see if it holds pressure - there should be a cool Honda gauge in the toolbox, or a fairing pocket. If you are planning to remove the carbs, you really need a shop manual, if you don't have one. Hope you tilted the engine to remove the airbox, 'cause it's darn near impossible to do otherwise without breaking something expensive. Keep us posted.
Dave
Dave
-
NobleHops
- ICOA Member
- Posts: 3872
- Joined: Mon Jan 25, 2010 7:17 am
- Location: Tucson, Arizona, USA
- Location: Tucson, Arizona, USA
Re: Immaculate 1981 Surprise
Airborne - happy to help. "Dave" I spoke of is daves79x, the Club's Technical Director. If he has time to help with your bike then you are in luck sir.
Please take this next advice to heart: Master the use of search on this site. We love to help, but you'll get further faster if you do few searches and read up on things too. This site is a TROVE of information on these bikes dating back many years. And if by "manual" you meant the factory service manual, then excellent, that is invaluable - you have to have and use that.
 Welcome!
Please take this next advice to heart: Master the use of search on this site. We love to help, but you'll get further faster if you do few searches and read up on things too. This site is a TROVE of information on these bikes dating back many years. And if by "manual" you meant the factory service manual, then excellent, that is invaluable - you have to have and use that.
Nils Menten
Tucson, Arizona, USA '80 CBX, sort-of restored :-)
Tucson, Arizona, USA '80 CBX, sort-of restored :-)
-
Airborne
- Forum Regular
- Posts: 30
- Joined: Thu Apr 30, 2015 4:32 pm
- Location: Terre Haute, IN
- Location: Terre Haute, IN
Re: Immaculate 1981 Surprise
Hello Gentleman,
Thank you kindly for all responses and advises. I will definitely keep looking through the site when I stumble across a problem, then will contact you in case I need a little explanation. I do have a manual that came with the bike, which is very detailed, however to do the carb job, per your recommendation I will have to additionally purchase Mike's manual and attempt the carb job myself. One step at a time, I will keep on checking other things like seals, breaks and tires, just to make sure all goes well, so carb problem is going to be the first step. I will keep you posted as I post pictures of the job. So far, I went to the garage on my lunch break to take additional pics of what you guys referred (gauges, tires, carbs, etc), therefore please find them attached. I managed to get the tank off again and will now try to get the carb rail off. I will post more pictures once this is done!
Thank you all once again and hope to stay in touch and update this feed as this project develops. I might print all these conversations out and hand it as a memoir booklet to my father as I hand him the keys to the bike, after it's all done, washed, polished and looking like new!
Kind regards,
Airborne
You do not have the required permissions to view the files attached to this post.
-
daves79x
- ICOA Technical Director
- Posts: 4751
- Joined: Sun Oct 01, 2006 8:05 am
- Location: Knox, PA
- Location: Knox, PA
Re: Immaculate 1981 Surprise
Did the carbs have the stock airbox? The crankcase vent looks to have an odd extension that shouldn't be there. That short hose should plug right into the air chamber. And you almost had to destroy something to get it out if you didn't tilt the engine. Speaking of - you don't have to remove the pipes to tilt the engine. Just loosen up the head clamps and take out the rear mounting bolts and it will sag far enough to get the job done. However now, you don't have to tilt it to get the carbs off and on. Jury is still out until we know what was on the bike for air filters.
If you are going to ride the bike - you have to get new tires. Good tread or not, they have to go.
Dave
If you are going to ride the bike - you have to get new tires. Good tread or not, they have to go.
Dave
-
EMS
- ICOA Member
- Posts: 10151
- Joined: Wed Mar 05, 2003 7:55 am
- Location: North East OH, ICOA 3904
Re: Immaculate 1981 Surprise
If I could ask you for a favor, while you are checking everything out: What is the VIN-/serial number of the bike and the build date as shown on the plate on the steering neck? 
-
Z Grand
- ICOA Member
- Posts: 384
- Joined: Sun Jun 28, 2009 7:06 pm
- Location: Walnut Grove, Georgia, USA
- Location: N. Georgia, USA
Re: Immaculate 1981 Surprise
Congrats and good luck. Bike looks like she should clean right up!
-
herdygerdy
- Power Poster

- Posts: 266
- Joined: Fri Nov 22, 2013 9:48 pm
- Location: Sydney, Australia
- Location: Sydney, Australia
Re: Immaculate 1981 Surprise
Hi Airborne,
You are definitely a good man for taking this on for your dear old Dad. I am sure he will be absolutely chuffed when you get this running sweetly for him again.
Probably worth checking valve clearances as well, that way you just KNOW it will be right.
Struggling to understand how you got the airbox off without a) breaking anything and b) not tilting the engine. Did it have pods on it by any chance? Anyhow, to help you on your journey and in case you need it, below will be of use. It's kind of a summary of what is in the Factory Shop Manual (FSM).
24 Steps to a Hassle Free Engine Tilt.
1. Put bike on mainstand and put a brick or chock in front of the front wheel. Better yet, use a load or tie down strap thru the front wheel and tie it back to the main stand and tighten. Also cable tie the front brake lever into the handlebar so the brake is on. This will prevent bike from accidentally rolling off the main stand as it gets jiggled around during the lowering process.
2. Remove seat, tank and if a Prolink, the lower fairing legs from each side.
3. Starting from rear of bike, remove chain guard (2x 10 mm bolts), remove split pin from rear axle nut and loosen but do not removerear axle nut. Undo chain adjuster lock nuts on both sides, back off the adjuster bolts a few turns, rotate adjusters downwards so bolts are pointing to the ground and push rear wheel as far forward as it will go. Slide the 2 wierd shaped axle stopper thingies (that prevent the axle from coming out backwards) out sideways from the end of the swinging arm. With the chain still on the sprocket, push the rear wheel as far forward in the swinging arm as it will go.
4. Undo 12 mm nut on gear change pivot shaft, 10mm bolt on gear change shaft spline and remove gear linkage assý. Be sure to keep all the washers, nut, bolt and fibre rings from gear change lever and pivot shaft together and put them all in a baggie.
5. Remove two 10 mm bolts from sprocket cover, remove bolts, the two seals and the black cover. No need to touch oil pressure, neutral light switch wiring that are now exposed, we deal with that later. Put these parts in their own baggie.
6. Remove the 8mm head bolt from LH side of end of starter motor and move high tension earth lead out of the way and reinstall the bolt finger tight.
7. Remove all 6 plug leads from the plugs and also remove spark plugs themselves from cylinders 1 & 6 only. Stuff a small rag into the two empty spark plug holes.
8. Remove the 3x 14 mm head bolts from each of the two the large triangular engine mount plates near the spark plugs and remove. The oil cooler will now flap about a bit as it is only being held in place by the two hoses.
9. Now remove the two 12 mm head nuts and bolts from bottom crash bar to crankcase mounting lugs and remove the bars in two halves. Put the two 12 mm nuts and bolts back into the bars lower mounting brackets and store them away somewhere safe.
10. Exhaust removal. Go to rear of bike, and remove the 14 mm head bolts holding on both pillion footrests. Undo the 12 mm nut on the back of the front bolt of the rear muffler mounting plates and leave the bolt sitting there as the only thing holding the mufflers up off the ground. DO NOT REMOVE THE LAST BOLTS JUST YET.
11. Undo the 12x 10 mm nuts that hold the exhaust mounting flanges on to the cylinder head and remove the 12 retaining collars. Loosen the 12 mm head bolt on the exhaust junction clamp on the left and right joint pipe just in front of the main stand. This will enable the two halves of the exhaust ass'y to be separated into left and right halves. Get a helper at the rear and with some wiggling and with the rear bolts (from 10. above) removed one at a time, you will be able to remove the header pipes and muffler ass'y in two separate halves. Its a bit of shagging about the first time, so cuss early and cuss often !! Put all loose parts in a baggie. Be sure to store the exhaust system somwhere where it can not fall nor anything fall on it to wreck your day.
12. Remove tacho cable from cyl. head end only and tie up out of the way. Be sure not to loose the teensy weensy little oil seal that runs on the inner cable of the tacho cable at the engine end. Undo the two 8 mm head bolts on the tacho drive housing on the cam cover, give the housing a wiggle to remove, and don't forget the O ring that sits under the housing. Remove the long tacho driven gear and washer. This is important, because many have broken this cam journal when removing cam cover without doing this. Put all these parts in their own baggie.
13. Remove the 3x 14 mm head bolts from both the left and right smaller triangular engine mount brackets behind the cylinder head. Put these and the brackets all in a baggie.
14. Looking down on the main tube that runs down the spine of the frame, just where the tank ends, undo and remove the two long 10 mm head bolts (usually black) that hold the top rear of airbox plenum chamber hard up against the frame. If not done already, remove the air filter box top with the two 8 mm head bolts and remove the air filter. You can now put your hand down through the empty airbox into the back of the plenum chamber.
15. Looking under the back rear of plenum chamber from the RHS, undo the screw of the large silver clamp that joins the air filter box to the airbox plenum chamber. This allows the plenum chamber to separate happily from the air filter box as engine is lowered. (plenum chamber comes down with engine, air filter box stays where it is.
16. Undo the 12 mm bolt of the brake pedal, remove the rubber bung on the end of the shaft (careful with these as if not well lubed they can break off if you try and wrench it out - a squirt of WD40 or similar and a gentle wiggle helps) and remove the brake pedal from the splined shaft.
17. On the handlebar, wind the clutch cable adjuster all the way in. Now Undo the two 12 mm adjuster and lock nuts on the clutch cable down at the clutch cover end and wind adjuster in until you can pull the cable inner down and release it from the actuator arm. Remove cable from handlebar lever and leave it so it can move downwards easily as the engine is tilted.
18 Undo the small triangular choke cable securing plate on the handlebar by undoing the phillips head retaining screw end only and remove the cable from the choke lever ass'y. As discussed, we won't touch the carb end of the choke cable just yet 'cos we want to see whats what with the choke plates when we remove the airbox.
19. Throttle cables. On LHS up near coils, is a long cable adjuster with an 8 mm nut and 10 mm lock nut. Wind the adjuster all the way in until there is no thread showing. Up on RH switch ass'y, unclip the small black triangular cable 'keeper' (about 6" down the cables towards the headlight - not sure if the high bars US models has this) and wind both adjusters in as far as they will go. Remove the 3x phillips head screws and open the switch assy. Disconnect both throttle cables. This can be a bit fiddly. See earlier comments on cussin' , but don't force anything. Pull cables out from behind headlight and to the left so they are pointing forward and along the LHS of the bike and are free to move unimpeded as the engine is lowered.
20. Remove RH plastic side cover under the seat. Look under airbox from RHS and you will see there are three bundles of wires heading to the two electrical connector mounting blocks. The small green one that disappears under the airbox and across to the LHS of the engine has the oil pressure and neutral light switches. Disconnect the green multiple connector carefully and pull then engine end out so it is free to move. Ditto the large red plastic connector from alternator (has yellow and white wires (if I recall correctly) going into it) and the large white one that goes to the ignition pulser units on the top of the clutch cover. There may be a fourth connector that goes to the coils and I think it is white. Not sure if that too needs to be disconnected, but I suspect not.
21. Now stop, go make yourself a cup of tea and take five mins to chill out and relax. While enjoying your cuppa, re-read this list and carefully check and confirm you have done each and every single step.
22. Only now put a small trolley jack & piece of timber or rag under the sump or under the oil filter housing and bring it up to gently take some of the weight of the engine. Using a 24 mm spanner or socket on the top engine mount bolt nut on RHS of bike and a 19 mm spanner on the other LHS end, undo the nut completely and remove it and the washer. Screw nut only back on backwards by hand (to protect the threads of the bolt) and gently tap it with a hammer from right to left. Remove the nut and now remove the bolt completely along with the large turned aluminium spacer that sit just above the countershaft sprocket through which this bolt passes on the LHS of the bike. Reassemble the bolt, spacer, washer and nut and put in safe place.
23. Loosen, but do not remove, the 24 mm nut on one or both ends of the lower engine mount bolt. This allows the engine to rotate downwards freely
24. Gently lower the jack in very small increments, checking each time there is nothing being pulled tight by the weight of the motor as it lowers towards the ground and the throttle, clutch and choke cables are also coming down happily. Don't be too concerned about the fairly tight S bend they will do as it is lowered.. Don't lower it any further than absolutely necessary but be assured because the drive chain is still attached to both sprockets, it can not fall to the floor !!
25. To remove airbox, undo the hose clamps screws (there are 6 of them) one found at the back of each carburettor. Remove the airbox to crankcase breather hose just above the alternator on LHS on top of the crankcase and remove the airbox.
26. To remove cam cover, undo the 8x small phillips head screws (4x each side) from the cam cover end caps. These can be bloody tight so an impact screwdriver with the correct tip helps heaps here. Remove caps, and baggie the four of them and their 8x screws.
27. Doing only a few turns at a time and in a criss cross pattern, undo the 8x 10 mm head bolts that secure the cam cover to the cylinder head, staring with the centre 4 then the two at either end. Undo each bolt just a little at a time and the cover can then be easily removed. Just before you pull it off, sliding a knife or gasket scraper around inbetween the BOTTOM of the cam cover gasket and the top of the cylinder head is a good idea and makes removal a snap. I know it seems to take forever to undo them, but don't rush this part, else you risk warping the cam cover. When reintalling these 8x bolts do NOT overtighten (they screw down onto a shoulder) else that can really wreck your day.
28. Be sure to leave a clean shop rag over the top of the now exposed valve train when not working on the engine.
Time to now take a seat, enjoy a quiet beer while you now reflect on your achievements and consider the next steps!!
Keep at it and you and your Dad will be richly rewarded. Oh and just one more, +1 on seeking assistance from Daves79X and others on this forum. They have forgotten more about CBXs than most folk will ever get to learn.
Please keep us posted on progress. Cheers..Tony
-
Airborne
- Forum Regular
- Posts: 30
- Joined: Thu Apr 30, 2015 4:32 pm
- Location: Terre Haute, IN
- Location: Terre Haute, IN
Re: Immaculate 1981 Surprise
Hello Gentleman,
Thank you kindly for all your responses and kind words, especially for your instructions HerdyGerdy, regarding engine tilting.
In response to your guys' questions, I was very fortunate that my father had six individual air filters, rather than original air box, therefore it was easy to remove without tilting the engine. I believe I can take the carb rail off right now without much trouble and I will be getting round to it hopefully next week. Still need to get my packages first in order to do the job right, but at least I can get the carbs off the engine soon.
In response to your question, EMS, it is either old VIN coding or something is wrong, as I could not verify that VIN online. It says it's incorrect. What I did get from the neck is this: SC060XCC402223. Built model 1982 (so I assumed wrongfully in my original post saying it's a 1981, but a few guys already notified me that a white one must be 1982).
I will be tackling carbs shortly and will keep you posted!
Kind regards,
Airborne
-
EMS
- ICOA Member
- Posts: 10151
- Joined: Wed Mar 05, 2003 7:55 am
- Location: North East OH, ICOA 3904
Re: Immaculate 1981 Surprise
Thank you Airborne!
Your VIN number is a correct number. It should have a build date on the plate on the neck of 9/81 (September 1981) But from what you are saying, I take it, the plate is missing??
Your VIN number is a correct number. It should have a build date on the plate on the neck of 9/81 (September 1981) But from what you are saying, I take it, the plate is missing??
-
daves79x
- ICOA Technical Director
- Posts: 4751
- Joined: Sun Oct 01, 2006 8:05 am
- Location: Knox, PA
- Location: Knox, PA
Re: Immaculate 1981 Surprise
Individual filters may seem like a fortuitous break for you, and it is for removing/installing the carbs, but not so much in actual running. If the carbs were not jetted appropriately, you'll have to do that before it will run right.
Dave
Dave