Is that an '80 or a Prolink frame? I thought it was an '82Jeff Bennetts wrote:Looks good, a few things for you to ponder. You're starting with an 80 frame, that's good because it has the extra frame brace below the side covers but you really should .
'Diamond in the rough'
-
EMS
- ICOA Member

- Posts: 10151
- Joined: Wed Mar 05, 2003 7:55 am
- Location: North East OH, ICOA 3904
Re: 'Diamond in the rough'
-
Jeff Bennetts

- Posting God

- Posts: 2421
- Joined: Wed Mar 05, 2003 8:38 am
- Location: Ohio, USA
- Location: Ohio, USA
Re: 'Diamond in the rough'
Ya Mike you're correct. They didn't put that that cross bar below the side cover until 81, oops, no top shock mount stud should have need the dead giveaway.EMS wrote:Is that an '80 or a Prolink frame? I thought it was an '82Jeff Bennetts wrote:Looks good, a few things for you to ponder. You're starting with an 80 frame, that's good because it has the extra frame brace below the side covers but you really should .My '80 does not have the bracing below the side covers
Did they make 80s with that bracing?
-
bikeymikey748

- ICOA Member
- Posts: 496
- Joined: Tue Aug 30, 2011 2:52 pm
- Location: Montreal, Canada
- Location: Montreal, Canada
Re: 'Diamond in the rough'
Hiya ,Jeff, thanks for the input. Some thoughts; I'm no engineer ( just ask anyone who knows me), but one of the things I really admire about CBXs is that the frame is almost like two seperate structures. The steering head area is,robustly, trianglulated and tied into the head. One of the pluses of that wide motor is that the load (from the four mounting points at the head) is spread over a broad area. Look at the size of the lugs that are intergral with the head castingLooks good, a few things for you to ponder....you really should consider some additional bracing
Similarily, the area where the swing arm ties into the plot is well done. Frame mounting points on the,industrial-sized, cases are over a large area, with heavyduty fasteners doing a job of holding things in place.
True, the older twin-shock, models feed large loads from their rear shocks' upper mounting points to both the steering head & swing arm areas. My '82 ProLoink feeds its rear suspension loads into the swing arm area alone. Also, I'm planning the project as a 'monoposto', I just need enough bracing aft of the tank and into the main frame, to keep my butt off of the rear wheel
I seem to recall reading somewhere that adding additional bracing might do nothing more than add,unwanted, weight.
I fit the rear shock up ,quickly, yesterday. Looks like I can get away with tying it into the ProLink's upper shock mounting area. Yup, lots of additional triangulation to go into that . The lower supension mounting arms won't be too far off of the center stand mounting points.I have to wait on my sprockets to get here to finalise positioning.
Dave, good news regarding that bearing,thanks for that. Yup, it's the bottom one that's buggard.
-
Jeff Bennetts
- Posting God
- Posts: 2421
- Joined: Wed Mar 05, 2003 8:38 am
- Location: Ohio, USA
- Location: Ohio, USA
Re: 'Diamond in the rough'
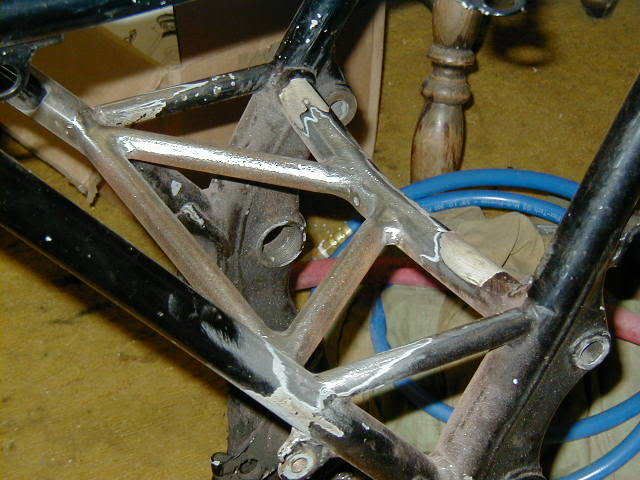
There's a good article in one of the past Expresses documenting a braced frame,it is on an 80 but will still transfer over to what you're doing. Yes the backbone is heavy duty but some bracing with flat stock will still be beneficial. The late models have extra bracing for the mono shock mount but I would still triangulate that area.
Even without a bunch of extra HP the heftier suspension and brakes you're hanging on there you should still stiffen the frame.
I'll try to find the Express Issue and volume # for you and you can take a look at it through the online archive Nils has downloaded here on the site.
Here's something to get you started, this is an 80 frame.
-
Jeff Bennetts
- Posting God
- Posts: 2421
- Joined: Wed Mar 05, 2003 8:38 am
- Location: Ohio, USA
- Location: Ohio, USA
Re: 'Diamond in the rough'
PM me your email addy and I'll send you some pics.
-
Jeff Bennetts
- Posting God
- Posts: 2421
- Joined: Wed Mar 05, 2003 8:38 am
- Location: Ohio, USA
- Location: Ohio, USA
Re: 'Diamond in the rough'
Mike and Barry, you have email.
jeff
jeff
-
bikeymikey748
- ICOA Member
- Posts: 496
- Joined: Tue Aug 30, 2011 2:52 pm
- Location: Montreal, Canada
- Location: Montreal, Canada
Re: 'Diamond in the rough'
I'm waiting on some parts to continue with the frame/suspension, so I turned my attention elsewhere.
Here's a shot of my new speedo/tach unit ( the innards have been removed in this shot, I'm making up the bracket for it). Its an ebay budget buy. I verified that the tach indicates the same revolutions as the stocker, it just doesn't seem to match the stocker's speed. There's only one +'ve and -'ve input, when the key is on, all functions operate. Key off, the clock function only holds memory for 1 1/2 - 2 hrs. I'll try to isolate its circuit and route constant power to it. The unit's speedo function is untested. I'm hoping for the best, the Suzuki front end I'm using has no provision for a cable-driven speedo. Units like this one are my only option.Aditionally, it has functions I can't use (gear position, fuel level), and lacks some I require (oil pressure light). Easy fixes all.

Here's the underside with the new brackets being fabbed/fitted, as well as showing the unnecessary steering stops removed;

I'll try to get some shots of my headlights and steering damper up later this weekend.
Here's a shot of my new speedo/tach unit ( the innards have been removed in this shot, I'm making up the bracket for it). Its an ebay budget buy. I verified that the tach indicates the same revolutions as the stocker, it just doesn't seem to match the stocker's speed. There's only one +'ve and -'ve input, when the key is on, all functions operate. Key off, the clock function only holds memory for 1 1/2 - 2 hrs. I'll try to isolate its circuit and route constant power to it. The unit's speedo function is untested. I'm hoping for the best, the Suzuki front end I'm using has no provision for a cable-driven speedo. Units like this one are my only option.Aditionally, it has functions I can't use (gear position, fuel level), and lacks some I require (oil pressure light). Easy fixes all.
Here's the underside with the new brackets being fabbed/fitted, as well as showing the unnecessary steering stops removed;
I'll try to get some shots of my headlights and steering damper up later this weekend.
Last edited by bikeymikey748 on Thu Jan 23, 2020 3:04 pm, edited 2 times in total.
-
bikeymikey748
- ICOA Member
- Posts: 496
- Joined: Tue Aug 30, 2011 2:52 pm
- Location: Montreal, Canada
- Location: Montreal, Canada
Re: 'Diamond in the rough'
LIGHTS 
Oh, and a steering damper !


Over at the local auto parts store,these are marketed as back-up lights for trucks. I've used them a bunch over the years. They have 55w. H3 bulbs (easy to upgrade more wattage/Xenon), and are simple to mount. I use one lens for 'high', the other for 'low'. In the past, I've fabbed internal deflectors for 'low' beam. This time I might use some kind of alloy external hood, sort of like a WW2 black-out affair.
Turns out that they, along with the instrument pod mounted up quite nicely where the original ignition switch for the Suzuki used to be. The 2005 GSXR front end is a good choice for this reason because the ignition mounts are central in relation to the top clamp (so I can use them for other things). Some model year Suzi bits are offset, not good.
The 'complete ' front end I bought was just that...complete. The seller even included the stock ( very good quality, and rebuildable) steering damper. Given the changes I'll be making, it seemed a goodd idea not to waste it.
Not likley I'll be putting the flashers anywhere near the forks either. I'm thinking of placing them on the outer/upper motor support plates. This might clean up the fork area while, hopefully, making the plates somewhat less of an eyesore
Oh, and a steering damper !
Over at the local auto parts store,these are marketed as back-up lights for trucks. I've used them a bunch over the years. They have 55w. H3 bulbs (easy to upgrade more wattage/Xenon), and are simple to mount. I use one lens for 'high', the other for 'low'. In the past, I've fabbed internal deflectors for 'low' beam. This time I might use some kind of alloy external hood, sort of like a WW2 black-out affair.
Turns out that they, along with the instrument pod mounted up quite nicely where the original ignition switch for the Suzuki used to be. The 2005 GSXR front end is a good choice for this reason because the ignition mounts are central in relation to the top clamp (so I can use them for other things). Some model year Suzi bits are offset, not good.
The 'complete ' front end I bought was just that...complete. The seller even included the stock ( very good quality, and rebuildable) steering damper. Given the changes I'll be making, it seemed a goodd idea not to waste it.
Not likley I'll be putting the flashers anywhere near the forks either. I'm thinking of placing them on the outer/upper motor support plates. This might clean up the fork area while, hopefully, making the plates somewhat less of an eyesore
Last edited by bikeymikey748 on Thu Jan 23, 2020 3:06 pm, edited 2 times in total.
-
steve murdoch icoa #5322
- ICOA Member
- Posts: 4074
- Joined: Tue Mar 04, 2003 9:12 am
- Location: St. Catharines, On. Canada
- Location: St. Catharines, On. Canada
Re: 'Diamond in the rough'
Boy you sure work fast.
This is great, keep the updates coming.
This is great, keep the updates coming.
-
bikeymikey748
- ICOA Member
- Posts: 496
- Joined: Tue Aug 30, 2011 2:52 pm
- Location: Montreal, Canada
- Location: Montreal, Canada
Re: 'Diamond in the rough'
The weather has cooperated these last days, so I switched gears, disassembled the calipers & gave 'em a spray.
Here they are still masked up & drying;

Just a few items to put back ;

DONE;

Lucky thing I stripped them too. They didn't look too bad, really great actually. But, there was quite an accumilation of contimination inside the front ones.
Believe me when I tell you that I cannot wait to put the squeeze on those bad boyz
Also, I plan on using GSXR rearsets. Funny thing was the GSXR shifter fitting/pivot had the wrong angle to it and the splines were a coarser arrangement than the 'X'. Additionally, the threaded fitting (for the pedal angle adjustment) had a 'regular' left-hand thread on the Suzuki part, and reverse threads on the Honda. I grafted the Honda fitting onto the Suzuki adjuster. I just machined a slot in both fittings ( that's the Honda fitting that's still disassembled, the slot is at 3 o'clock.To its left is one of the retainers and beside that, the Suzuki fitting) to remove the spring retainers, and then assembled the bits I wanted ( that's the finished Honda/Suzuki bit at the bottom of the photo).

Here they are still masked up & drying;
Just a few items to put back ;
DONE;
Lucky thing I stripped them too. They didn't look too bad, really great actually. But, there was quite an accumilation of contimination inside the front ones.
Believe me when I tell you that I cannot wait to put the squeeze on those bad boyz
Also, I plan on using GSXR rearsets. Funny thing was the GSXR shifter fitting/pivot had the wrong angle to it and the splines were a coarser arrangement than the 'X'. Additionally, the threaded fitting (for the pedal angle adjustment) had a 'regular' left-hand thread on the Suzuki part, and reverse threads on the Honda. I grafted the Honda fitting onto the Suzuki adjuster. I just machined a slot in both fittings ( that's the Honda fitting that's still disassembled, the slot is at 3 o'clock.To its left is one of the retainers and beside that, the Suzuki fitting) to remove the spring retainers, and then assembled the bits I wanted ( that's the finished Honda/Suzuki bit at the bottom of the photo).
Last edited by bikeymikey748 on Thu Jan 23, 2020 3:12 pm, edited 4 times in total.
-
bikeymikey748
- ICOA Member
- Posts: 496
- Joined: Tue Aug 30, 2011 2:52 pm
- Location: Montreal, Canada
- Location: Montreal, Canada
Re: 'Diamond in the rough'
Sorry to leave you hanging, health issues stepped in. Now we're good to go 
The swing arm pivot is finalised. My original ideas were unworkable. In the end, I modded the Suzuki shaft slightly ( cut 10mm. from the left hand side, and cut more threads on the right), made a proper spacer. I also machined the hex head off of the right hand Honda collar,opened it up to allow the Suzi pivot shaft to go through and drilled two small holes in its face so a 'special' tool I fabbed could be used to seat it. Voila;

In situ;


Looking at the last photo, you can see I just managed to keep enough of the original Allen head fitting on the Suzuki pivot shaft. Ideally, I'd like it shorter for aesthetic reasons. I also cut the lower motor support bolt/shaft down to size/added threads as I won't be using the stock footpeg plates.
Also managed to get my sprockets into alignment
I picked up a 10mm. offset countershaft sprocket from Krueger-Junginger, nice bit of kit. They recommend only 7mm. for '82s, but the only clearance issues seem to be centered in the rear subframe members. I won't be keeping these and the chain looks good to clear the main tubes. Though....I may yet have to bevel them slightly when all is said and done.


The laser was a B#@*h to work with and only helped to verify what I managed to pull off using some brackets/'C' clamps/'trueing' rod. I have to say...pretty chuffed with the results. Another hurdle behind me.
Essentially after picking up precious space by flipping the beveled rear sprocket inwards, I had to recess the cush drive assembly into the wheel itself.

Starting with the center spacer, everything had to be machined. You can see, to the right, the spacer I had to fab to go between the swing arm and the wheel to compensate for the material I removed from the cush drive.


Look at just how close the level of the sprocket , on the CD, is to the wheel proper
I have the rubber pucks to cut yet, not looking forward to that.
The forks seals seem suspect, so I should get to them shortly and then the next (!!!) biggie will be fabbing the rear shock mounts.
The swing arm pivot is finalised. My original ideas were unworkable. In the end, I modded the Suzuki shaft slightly ( cut 10mm. from the left hand side, and cut more threads on the right), made a proper spacer. I also machined the hex head off of the right hand Honda collar,opened it up to allow the Suzi pivot shaft to go through and drilled two small holes in its face so a 'special' tool I fabbed could be used to seat it. Voila;
In situ;
Looking at the last photo, you can see I just managed to keep enough of the original Allen head fitting on the Suzuki pivot shaft. Ideally, I'd like it shorter for aesthetic reasons. I also cut the lower motor support bolt/shaft down to size/added threads as I won't be using the stock footpeg plates.
Also managed to get my sprockets into alignment
I picked up a 10mm. offset countershaft sprocket from Krueger-Junginger, nice bit of kit. They recommend only 7mm. for '82s, but the only clearance issues seem to be centered in the rear subframe members. I won't be keeping these and the chain looks good to clear the main tubes. Though....I may yet have to bevel them slightly when all is said and done.
The laser was a B#@*h to work with and only helped to verify what I managed to pull off using some brackets/'C' clamps/'trueing' rod. I have to say...pretty chuffed with the results. Another hurdle behind me.
Essentially after picking up precious space by flipping the beveled rear sprocket inwards, I had to recess the cush drive assembly into the wheel itself.
Starting with the center spacer, everything had to be machined. You can see, to the right, the spacer I had to fab to go between the swing arm and the wheel to compensate for the material I removed from the cush drive.
Look at just how close the level of the sprocket , on the CD, is to the wheel proper
I have the rubber pucks to cut yet, not looking forward to that.
The forks seals seem suspect, so I should get to them shortly and then the next (!!!) biggie will be fabbing the rear shock mounts.
Last edited by bikeymikey748 on Thu Jan 23, 2020 3:32 pm, edited 5 times in total.
-
bikeymikey748
- ICOA Member
- Posts: 496
- Joined: Tue Aug 30, 2011 2:52 pm
- Location: Montreal, Canada
- Location: Montreal, Canada
Re: 'Diamond in the rough'
Started to tackle mounting the rear shock/linkage.
Cutting/grinding the lower frame member to prepare for new pieces (38mm. in diameter, its a great piece);

Drawing up lower mounts from measurements I've already taken (please GOD let me be accurate!);

Cut out a cardboard form to check for correct sizing on the bike;

First cuts to strap stock I had lying around;

Ready to tack onto frame;

Now, I'll just repeat the process for the upper mount.Though, as the diameter of the frame member I'll be tacking onto is of a small diameter, it won't bear much load. That, and the issue of the shock being an appreciable distance from it necessitates additional triangulation ( read;tubing) from that point to another section of the main frame.
Wish me luck
Oh and, funny thing. The faces of the rear motor support mounting points ( on the frame) were not machined properly. In fact, on their inner faces, the area that mated with the engine cases actually had welding slag in places. It was impossible for them to sit properly, the lower mounting bolt had a slight bend in it from trying to conform to the imperfections. Between cautious use of a grinder and then applying valve grinding compound to a spare bolt I had and running it back and forth over the area, I managed to get the frame to sit properly against the motor, and the bolts to sit squarely against the frame.The lower ones were especially bad, perhaps Honda assumed proper maching was unnecessary as the footpeg plates would compromise for the imperfections?
Cutting/grinding the lower frame member to prepare for new pieces (38mm. in diameter, its a great piece);
Drawing up lower mounts from measurements I've already taken (please GOD let me be accurate!);
Cut out a cardboard form to check for correct sizing on the bike;
First cuts to strap stock I had lying around;
Ready to tack onto frame;
Now, I'll just repeat the process for the upper mount.Though, as the diameter of the frame member I'll be tacking onto is of a small diameter, it won't bear much load. That, and the issue of the shock being an appreciable distance from it necessitates additional triangulation ( read;tubing) from that point to another section of the main frame.
Wish me luck
Oh and, funny thing. The faces of the rear motor support mounting points ( on the frame) were not machined properly. In fact, on their inner faces, the area that mated with the engine cases actually had welding slag in places. It was impossible for them to sit properly, the lower mounting bolt had a slight bend in it from trying to conform to the imperfections. Between cautious use of a grinder and then applying valve grinding compound to a spare bolt I had and running it back and forth over the area, I managed to get the frame to sit properly against the motor, and the bolts to sit squarely against the frame.The lower ones were especially bad, perhaps Honda assumed proper maching was unnecessary as the footpeg plates would compromise for the imperfections?
Last edited by bikeymikey748 on Thu Jan 23, 2020 6:41 pm, edited 5 times in total.
-
bikeymikey748
- ICOA Member
- Posts: 496
- Joined: Tue Aug 30, 2011 2:52 pm
- Location: Montreal, Canada
- Location: Montreal, Canada
Re: 'Diamond in the rough'
Short post t-day.
Looks like my habit of over-thinking things bit me on the ass....again.
Seems I had to do a little re-shim to the rear arm...God, where's my head.Sprocket align was a doddle to correct too, lucky me. Thing is, I caught it just as I was about to tack in my upper shock mount.
Speaking of which...a little quizz...I was going to fab a boxed upper section from multiple pieces, when I stumbled on this in my stash of bits. Any guesses what its intended use was in another life? Suitably braced,its a great stamping with most useful strengthening...
Last edited by bikeymikey748 on Thu Jan 23, 2020 6:45 pm, edited 3 times in total.
-
Rick Pope
- ICOA Rally Director
- Posts: 2275
- Joined: Wed Sep 03, 2003 3:16 pm
- Location: Lawrencburg, IN
- Location: Lawrenceburg, Indiana
Re: 'Diamond in the rough'
I'll hazard a guess that it's a motor mount? Or tranny mount?
Rick Pope
Either garage is too small or we have too many bikes. Or Momma's car needs to go outside.
Either garage is too small or we have too many bikes. Or Momma's car needs to go outside.
-
steve murdoch icoa #5322
- ICOA Member
- Posts: 4074
- Joined: Tue Mar 04, 2003 9:12 am
- Location: St. Catharines, On. Canada
- Location: St. Catharines, On. Canada
Re: 'Diamond in the rough'
Almost looks like a chain adjuster cavity from a boxed swingarm.